The 4-1-1

So....you volunteered. Now what? You search the web aimlessly...okay, frantically, for that perfect something to show your child (and the world) how special they are. Send in ordinary cupcakes- out of the question. Store bought - never! But, you also don't want to repeat what the last mother did...no matter how fantastic.

You have just entered the mind-set of the "ROCKSTAR" parent.

Pretty soon, mothers and fathers will be saying "How did you do that?" and "That's so cool!" or "Mmmmm, delicious! I MUST have the recipe!" Before you know it, you will be called upon so regulary for contribution that you will almost hear the crowd cheering and see your name in lights!

That's exactly what my road to stardom was like. But, it didn't end at kid functions. Nope. My family and friends noticed the extra-special attention I gave to gatherings. Whether it was a weekend at the lake or Thanksgiving dinner, there was always something extraordinary to make my loved ones feel exactly that~ loved. So, my input is regularly given and I love it!

Within this blog you will hear just about everything; including successes AND failures. (Afterall, you don't have to be perfect to ROCK!!) Favorite recipes, party ideas, ways to save time and $$$ - you name it. A lot of things are pulled from the Ultimate Resource Guide (aka "the www"); but, others are my own tricks. The beauty is that it's all right here.

Are you ready to ROCK??


Search This Blog

Showing posts with label kids. Show all posts

Sunday, October 10, 2010

Harvest Party Time

It's Harvest (aka Halloween) Party time!  Are you tired of the same old cut-out cookie recipes and bobbing for apples?  Sometimes we ROCKSTARS like to sing a different tune.  My idle fingers hit the internet in search of some cute, ROCKIN' harvest ideas and here's what I found:

Owl sugar cookies.  Super cute and kid's can help decorate. 'Nuff said.  
Find them at http://www.cheekykitchen.com/2010/09/owl-sugar-cookies.html


Scarecrow Cookies.  Again, super cute and the kids can help decorate.  Whether you put them on a stick or not, these are anything but scarey :)  Cut time by using a bagged sugar cookie mix and pre-made icing.
http://www.skiptomylou.org/2008/10/07/more-bake-sale-goodies/


OMGosh! How great are these?  They may not go over so well for a school-function, but these will surely be on my table!  I love these.  Make them your own by pulling out your gingerbread man cookie-cutter early this year, or whip them out in a snap using pre-make gingerbread cookies and frosting.
http://rootsandwingsco.blogspot.com/2009/10/adorable-gingerbread-skeleton-cookies.html

No fall party is complete with out candy corn.  Why not make it a cookie? These are a lot easier than they look.  http://www.bettycrocker.com/recipes/candy-corn-cookies/2c40f5fa-fdb9-4236-b896-4097bfd1af36

Game Time

There are so many great games to play with kids during the fall.  Here are a few that caught my attention:

Needle in a Haystack.   Fill an inflatable/plastic kiddie pool with hay.  Mix in little toys (i.e. spider rings) and let the kids go crazy looking for their prizes.

Ring the Pumpkin.  Don't put away those dive rings yet.  Line up several pumpkins with long stems or miniature pumpkins.  Let the kids ring them for points or prizes!

Pin the Nose on the Pumpkin.   Switch out the donkey for Fall's favorite gourd and you have a hit!  You can customize this by using a witch and broom, skeleton and bone, turkey and feather, etc.

Gourd Race.  Using gourds and brooms (or rakes), create a starting line and finish line.  The first one to broom their gourd past the finish line wins.  Since the gourds are not perfectly round, they will not roll straight, so it will be fun to watch the kids case down their gourds!

Wednesday, July 7, 2010

Travelling Show

Summer means it's time for a break from the daily routine. Whether that means travelling or enjoying a "stay-cation", we all deserve it.  This year, I am driving 18 hours to spend a couple weeks with family.  You read that right, 18 hours with my 6 and 2 year old, in a sedan.  (Let's just say that not all ROCKSTARS are comfortable jet-setting!) 

Being the list-maker, planner, ROCKSTAR that I am; I have scoured the internet looking for fun ways to keep my children entertained (and my sanity in tact)!  Not the normal : DVD player, crayons, hand-held game system, or MP3 player.  Afterall, if the trip is longer than an hour, my car is usually packed with any combination of these.  I wanted something new (at least, new to me...)

I learned a few tricks that I think will work and have some hits of my own that I will share. I also came across some wonderful sites:

Before you go: Prepare your kids for the length of trip.  Let them know you will be travelling during the night.  Talk about some of the things they will see and the games you will play.  Let them pick out some of their favorite things.  I have a bag for each of my kids and they are limited to what they can fit in the bag.  Remind them about safety and strangers. 

Here are some of the fun games I'm going to try:

1.  Colorforms.  Kids can create pictures on their side windows.  Amazon offers several sets, including a road trip one that looks really cute.  The price ranges from $3-$10.

2.  Travel Bingo.  Momsminivan.com offers a couple free printables.  Or, make your own using the spreadsheet program on your computer.  Just make your columns, insert clip-art of the items you want to find and print it out.  (Just remember: each player's card must vary slightly, otherwise, everyone in your car will hit "BINGO" at the same time!)  Laminate the cards and pack some dry erase markers, so the cards can be re-used.

3.  Brown Bag Puppets.  I like this because, it has many uses.  The bags can be folded flat for storage and are cheap.  Your child can decorate the bag, create a story, and make as many as they want!  In a pinch, the bag can be used if your child gets carsick, for a trash sack, and they are completely recycleable. 

Kids Map of the United States: Fun Things to See and Do4.  Word Play.  Have your child write down words that they see (on billboards, semi-trucks, signs, etc.)  Once they get a certain amount, have your child write/ recite a story using all the words.

5.  Scavenger Hunt.  Create a list before you leave of items you think you will see along your journey.  If you have an older child, challenge them to get a photo of each item.  Whoever completes their list first wins!

6.  Give them a map.  I found a great one from Rand McNally that lists fun things to do along the way, too.  I'm a huge supporter of taking quality stops with my kids while on a long trip, so this helps both of us!

7. Treasure Bottle.  You will  have to do some planning for this one.  Use a bottle with a lid (i.e. 2 liter bottle or water bottle) Fill it 2/3 with rice.  Add small treasures from your house (legos, paper clips, pennies, bolts, Polly Pocket stuff, Barbie shoes, etc.)  Keep count and a list of the items you place in the bottle.  Secure the lid (I suggest using duct tape.  I don't know about you, but I'm not up for cleaning cups of rice from my car.)  The child rolls the bottle around until they have located all of the items in the bottle. 

8.  Blow Bubbles.  Yep.  Take a small bottle of bubbles and have your co-pilot blow bubbles back to your kids, so they can pop them.  Get creative and see if you can blow bubbles using your A/C vent.  If you're up to it, get a couple of those "no-spill" (aka it'll slow it, but my kid ALWAYS finds a way to spill) bubble containers and let your kids have at it. 

9.  Lid Battleship.  It's inevitable that you will stop at a drive thru the way to your destination.  Have the players punch rootbeer, diet, cola, other.  The players take turns guessing someone's "battleship".  The last person with their "battleship" undiscovered wins.  Pop them back up and play again!

10. Secret Prizes.  What fun are games without prizes?  Head to your local dollar store and pick up a variety of toys.  Don't tell your kiddos.  Wrap them up and hide them in your glove box and present the winner of each game with a new trinket.  Or, place them in a dark bag and let the winner choose; but, no peeking!

Don't forget the fail-safe games we used to play as kids, like: I spy, Racecar, Guess Who, the License Plate game, and the various alphabet word/name games.  It's also good to pack a pillow, favorite toy, stickers, and some books.  If you are able, purchase a couple of new books or check some out at your local library, so they are fresh and exciting for your child.  My girls can spend hours playing with magnetic story books.

Be prepared.  I always have: 
  • Disinfectant wipes and papertowels: Readily available
  • Windex and extra paper towels:       In the trunk.  
  • Bottled water:   Several years ago my oldest child got car sick and I happened to have  bottled water in the truck to refill the cooler.  It was warm because it had been in the trunk for several hundred miles in the southern heat.   My child received a nice, warm bath on the side of the road and was good as new.  
  • A bag for trash.  Keeping your vehicle as orderly and clean as possilbe WILL help.  I usually use some old grocery bags or retail bags.  You can also designate a side pocket, just line it with a bag or some paper towel to make clean up easier. 
  • First Aid Kit
  • Emergency Roadside Kit
  • Blanket and Pillow
Health (1-year)As a mother, I learned quickly to never travel anywhere without snacks, and a roadtrip is definitely no exception.   The quality of your snacks should not suffer because you are on vacation.  (Don't get me wrong, I am certainly more forgiving with my children, but you don't have to sacrifice everything!)  Ironically, I recieved my monthly Health magazine that had a very good article entitled "Road Trip! Eat Healthy-Anywhere!"  It listed some of the best (and next best) items you can purchase at the gas station, rest stop, fast food, diner, or pizza/mexican/sandwich chain.  It also gave some helpful hints to packing your snacks.  Here's a summary:

In the cooler:  water, baby carrots, high-fiber, low-cal fruits (think grapes, apples, blueberries), low fat cheese sticks, single-serving hummus, and drinkable yogurt.

Outside the cooler: bananas, trial mix (make your own), granola bars, 100-cal packs of crackers (so, you aren't downing the entire bag of cheese-it's while concentrating on your driving!), and single serve boxes of cereal (grab some from the hotel breakfast).

There are healthy options to satisfy both your sweet and crunch cravings.  Also, try not to pack anything requiring utensils or a lot of napkins (hence the drinkable yogurt).  This only adds to the list of things to remember and let's face it...your car's square footage seems to decrease with every mile during a road trip. 

I would suggest packing snacks in single-serve baggies.  You can pass it back to your kids easily and you aren't left wondering where you are going to store that jumbo size bag.  It also helps with portion control.  Remember, you can always restock your cooler.  If you have room, you may consider keeping a larger cooler in the back to replenish a smaller cooler in the passenger compartment. 

If you are planning on staying at a hotel, there will be either a microwave in your room or you are sure to find one in the lobby.  Pack a couple bags of popcorn, some easy-mac for the kids, or a low-sodium soup to help cut costs.  These will be more filling and healthier than a fatty candy bar, bag of chips, or sugary soda from the snack machine.  Especially, if you are rolling into the hotel at an odd hour. 

TRAVELLING TRAIL MIX

Planters Trail Mix, Energy Mix, 1.5-Ounce Pouches (Pack of 30)• Dried fruit: raisins, dried apricots, date nuggets, banana chips, apple chips, dried papaya, dried cranberries, dried cherries.
• Nuts and seeds: peanuts, almonds, hazelnuts, sunflower seeds, pistachios, cashews 
• Sweet: M&Ms, chocolate chips, white chocolate chips, carob chips, dried coconut, gummy bears
• Salty: Pretzels, sesame sticks, oriental rice crackers, salty "party mix" cereal, rye disks,
• Cereals: Any breakfast cereal, granola.

-Mix equal portions of desired ingredients and store in an air tight container or storage bag.


I hope you all have safe and happy travels! ROCK ON!


Saturday, June 12, 2010

Fourth of July Fun

One great thing about a holiday is that you already have a theme.  I love themes!  Themes give you color, food ideas, games and more! And, for the Fourth of July, you are about to set off some ROCKSTAR fireworks of your own!  Grab your potato salad, fire up the grill, and light the pyrotechnics, it's time for the best birthday party of the year!

We generally head down to my in-law's lake house for the fourth of July. The lake Association puts on a decent fireworks display and we can watch them from around the campfire.    We have several toddler's and some elementary children, so there needs to be a range of fun.  Also, we are down there for the weekend, so I like to have several activities.  Here are some of the ideas I have for Fourth of July fun. 

1.  Talk About It.  Don't forget the "reason for the season".  You've heard this before, don't miss an opportunity to educate your child.  There are so many wonderful resources geared toward children.  We picked these books from our local library:  Corouroy's 4th of July, Fourth of July Sparkly Sky, and Hats Off for the Fourth of July.   I'm planning on reading a book a day over the weekend, so we can remember why we are all gathered together.  Certainly, you can get a bit more educational, depending on the age of the children.  I there are a ton of word searches and puzzles available on-line.
Hats off for the Fourth of July (Christian Mother Goose)

2. Make a Craft.   There are several crafts available through Oriental Trading Company, and they are very inexpensive.  I found visors and puff star stickers for under $1/each.  This is perfect for all ages.  The kids get to wear them the rest of the summer and they block harmful UVA/UVB rays.     I also found make-your-own flag magnets are Jo Ann Etc. for 2/$1.  Kids love crafts, so why not incorporate it into your party?  The key is to have enough available so they don't get bored, while still giving them free time to play in the sand box, teeter totter, play cornhole, fish, kayak, go to the pool and swing.  

3. Have a Parade.  Have the children decorate their bikes, scooters, wagons, etc. with streamers, noise makers, flags, etc. and have a parade for all the parents.  Paper streamers are very inexpensive and don't forget about those "old-fashioned" paper-chains we used to make in grade school! 

4. Play Extreme Hula.  This is my favorite.  Get some red, white and blue helium-filled balloons from your local party store.  Get a hula hoop (players can share one or you can have one for each person playing, whatever is available).   Write different "point" denominations on each balloon (i.e.  5, 10, 15, 25...).  Stagger the balloons in the yard close enough that the hula can reach it, but spread out enough that you won't ring two balloons at once.  Each person takes a turn and tries to ring the balloon with their hula hoop.  Have someone keep score.   Now, you can vary this by either having every one throw a certain number of times, or set a timer and let people throw as many times at they want within a given time period.  It depends on the age of your players.

5.  Sing Songs.  Teach a patriotic song like: Yankee Doodle, The Star Spangled Banner, Grand Old Flag, etc.  You can also play these songs and let the children dance around.

There are so many other ways to incorporate Independence Day into your child's routine.  Use patriotic coloring pages at crayon time.  Use only red, white, and blue play-doh for the week.  Have them wear red, white or blue.  Make red, white and blue snacks or meals.   While you're incorporating these things, talk to your child about patriotism, the USA, and the Fourth of July.

And, please, don't forget that any party needs really ROCKIN' food!  I am always very flattered when one of my family members requests a dish that I make.  Especially when they tell me that they've tried to make it, but it "just doesn't taste as good."   Encore! Encore!  However, I get a bit bored making the same things.  We all have a favorite song, but every once in a while we have to change the station.

The Fourth of July is one of those times where you can have all the favorites (baked beans, potato salad, pasta salad, watermelon...), but put your own spin on it to really ROCK.  Here are a few recipes and serving ideas that will ROCK your Independence Day.  If you are having a carry-in, challenge your guests to only bring red, white and blue dishes! 

CELEBRATION CUPCAKES  (My own recipe! Enjoy!)

Description:  white cupcakes with strawberry filling, butter cream icing, with a sugared, blueberry star on top.  Sound yummy?  Here's how you do it:

You will need:

White Cake Mix 
Large Instant White Chocolate Pudding
Strawberry Pie Filling
Filling Pastry Tip
Pastry Bag

Buttercream Icing (I follow the Wilton recipe)

1/2 cup solid vegetable shortening
1/2 cup (1 stick) butter or margarine softened
1 teaspoon clear vanilla extract
4 cups sifted confectioners' sugar (approximately 1 lb.)
2 tablespoons milk

Makes: About 3 cups of icing

THE CUPCAKE

Use a white cake mix, add a package of vanilla pudding.
    Bake cupcakes according to package directions.
    I always set my timer for 15 minutes and watch. 
**Remember that cupcakes will continue to bake a bit after they are removed from the oven; however, if they aren't cooked enough, they will sink in the middle!**

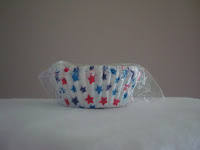
I found these star-studded cupcake liners at Jo Ann's for $1/ 50 count. 

Double up on your liners, so the color stays vibrant.

After the cupcakes are thoroughly cooled, it's time to fill them.
     Fit your pastry bag with the Wilton 230 Filling Tip.
     Fill the pastry bag with Strawberry Pie Filling.
     Insert the tip directly into the center of the cake and apply slow pressure, filling the cupcakes.
     - I usually do a 3 second count.

Mix your icing, and frost your cupcakes, as desired.  I like to pipe my icings on.

Place your iced cupcakes in an air tight container and store them in the fridge while you make the cookie toppers.

COOKIE TOPPER

You will need:

Your favorite cut-out cookie recipe  (mine follows)
Small Star Cookie Cutter
Blueberries
White or Blue sugar sprinkles

This cut-out cookie recipe has been in my family for years.  So long, the index card is yellow and has remnants of cookies past.  You know it's good!

1 C       butter, softened
1 1/2 C confectioner's sugar
1           egg
1 tsp     vanilla
1/4 tsp  almond extract   (if you don't like almond, substitute vanilla)
2 3/4 C flour
1 tsp     baking powder
1/4 tsp  salt

Cream the butter, sugar, egg and vanilla together  until smooth. 
Add remaining ingredients. 
Chill, in air tight container, for 1 hour

Use confectioner's sugar to flour your working space.
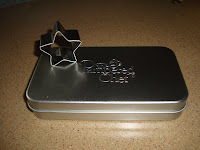
Roll chilled dough to 1/4 inch thickness and cut out your star shaped cookies.  I used the star from my Pampered Chef Creative Cutters set.

Place your blueberry in the center, pushing down gently, and sprinkle with sugar.

Bake, ungreased cookie sheet, 350 degrees, 8-10 minutes.

Cool thoroughly.

To finish, just stick the two lower points of the star into the frosted cupcake.  Assemble cookies just before serving because the buttercream will soften the cookie.

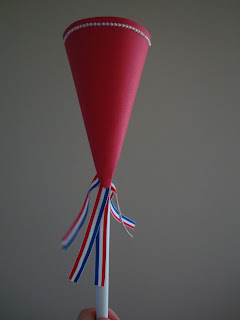
I am also serving up good ol' fashioned caramel corn, but I'm putting a ROCKSTAR twist on it by serving it up in paper cones that are sized just right for little hands!

CARAMEL CORN  (on behalf of Karo)

Cooking Spray

4 quarts popped popcorn
1 cup brown sugar
1/2 cup Karo® Light OR Dark Corn Syrup
1/2 cup (1 stick) butter OR margarine
1/2 teaspoon salt
1/2 teaspoon baking soda
1 teaspoon Spice Islands® Pure Vanilla Extract

Spray a large shallow roasting pan with cooking spray. Add popcorn and place in preheated 250°F oven while preparing caramel.

Mix brown sugar, corn syrup, butter and salt in a heavy 2-quart saucepan. Stirring constantly, bring to a boil over medium heat.

Boil 5 minutes WITHOUT STIRRING. Remove from heat. Stir in baking soda and vanilla.

Pour syrup mixture over warm popcorn, stirring to coat evenly.

Bake for 45 minutes, stirring occasionally. Remove from oven and spread on foil that has been sprayed with cooking spray.
Cool; break apart. Store in tightly covered container.

PAPER CONES
Heavy Card Stock
Scissors
Double sided tape
Other embellishments, if desired

I located the template for the cone on the Internet.  Just google "Paper Cone Template".  I previewed the templates by searching "Images" and clicking on the picture of the template that met my needs.
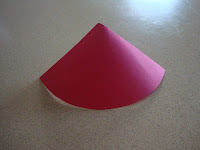
Start by tracing the template and cutting out your cone.  I shaped mine in my hand before adding any adhesive, so I could see how it would line up.

I added ribbon to the inside of mine, so it would hang out the hole in the bottom of the cone.

Apply your double sided tape to the side of the cone that will end up on the inside of your cone.
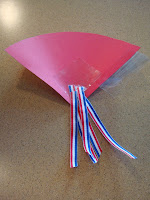
Wrap the cone and press the tape down securely.

Add a second piece of double sided tape to secure the edge of the cone that ended up on the outside (so it doesn't stick up).

Add any additional embellishments to the outside. 

Fill your cones and enjoy!   Here's my finished project.  Display them in a deep container or punch two holes on opposite sides of your cone, string a ribbon through the holes, and hang them for display as well.


Here are a few more recipes you might like to try for your Independence Day party.


PATRIOTIC PASTA SALAD

STAINED GLASS JELLO   (the Food Librarian used purple and yellow, but use red and blue for the 4th!)

PRETZEL SPARKLERS  (use white chocolate and red and blue sprinkles)

Color tint milk, use strawberries and blueberries on top of ice cream, make blueberry pancakes and have strawberry syrup and whipped cream, make sugar cookies and sprinkle them with red and blue.  (Make them all star shaped for a really great display!) 

I HOPE YOUR FOURTH OF JULY ROCKS!!

Sunday, June 6, 2010

Summer Fun

Inflatable Beach Balls Set of 20 - 18"Summer is filled with so many wonderful sounds and smells: chlorine, lemonade, charcoal, freshly cut grass, flowers, children laughing, sprinklers.  The list is endless.  With all the fabulous things Summer brings, you would think that occupying your children (or other people's children) would just happen.  Riiiiight.  Sometimes, the thought of entertaining your own child/children for hours a day, for days and weeks at a time can be somewhat daunting.  I'll just say it: my kids get somewhat annoying when they are bored.  That's not really how I envisioned my first Summer as a SAHM.

My husband's financial brain and my type-A personality can be a lethal combo.  Most of the time it works pretty well, but sometimes it's a bit challenging.   (I want to sell out arenas, but my manager has me playing county fairs.)  I am often challenged with finding new and creative ways to ROCK.  I need to be the best mom I can be on a budget that satisfies my need to be an over-achiever and solidify my career as a stay-at-home-mom and, most importantly, makes my fans applaud.


One of my favorite sayings is "Lack of preparation on your part does not constitute an emergency on mine."  As parents, we quickly learn that taking the time to prepare is very important.  It keeps the everything in tune.  I also believe that you can't plan everything.  It's fun to improvise and it's also important for our children to be able to bob and weave, ebb and flow.  If things are too structured, they are less likely to be able to handle change successfully....and, what's the one thing that's constant? 

Jolees By You Large, Beach UmbrellaHere are a number of brainstorms that I came up with to make our first Summer together ROCK.  Some are very simple, others a bit more detailed.  I would encourage you to remember my 10 Tips to Parenting Like A Rockstar while planning your activities. 

  1. Make paper airplanes. Decorate them, have races, see which one goes the farthest
  2. Lemonade stand.  The kids will have a blast decorating the sign, plus you can take the opportunity to learn about money and get the chance to mingle with your neighbors.
  3. Play in the sprinkler.  Who needs anything fancy? Grab the lawn sprinkler and your sunscreen.
  4. Ride bikes.  Pack a lunch and make it a journey. 
  5. Norpro Ice Pop Popsicle MakerPlay an old game.  Try hopscotch, 4-square, croquet, boche ball,  Frisbee, or jacks.  Kids are inundated with video games and electronics.  Take them outside and back to basics.
  6. Have a treasure hunt.
  7. Make a time capsule.
  8. Make your own Popsicle.  I found some plastic Popsicles molds at my local Dollar General.  They also retail on-line for around $10.
  9. Make your own ice cream. You don't have to have an ice cream machine.  Follow the easy steps from David Lebovitz.
  10. How to Make a Chemical Volcano: And Other Mysterious ExperimentsTie-dye.  For instructions visit Ritdye.com.  You don't have to stick with t-shirts.  Try shorts, cotton bags, or socks.  I found an interesting idea of hanging an old white sheet outside, mixing color dyes with water in squirt bottles and letting the kids spray a beautiful abstracts.  The sheets can be used for bedding, the beach, for picnics in your backyard.
  11. Make a Volcano.  You can get the instructions here.  You can also take a trip to the local library and check out How to Make a Chemical Volcano: And other Mysterious Experiments.  It is actually written by a 13 year old! 
  12. Have a tea party.  Don't forget the tablecloth, napkins, and cucumber sandwiches! Really get creative and have the kids dress-up in fancy hats, ties, and dresses.
  13. Learn magic tricks and put on a show.  Take some time each day to learn some simple magic tricks.  On Friday, put on a show.  The kids can even make their own "magic capes" by decorating old sheets.   Here are 9 to get you started!
  14. Play the recorder.   Oh, the memories.  My girls actually have plastic recorders.  I found them for a dollar and couldn't resist!  You can learn how to play some simple songs here.
  15. Go on a picnic.  Visit parks in your area or throw a sheet down in the backyard. 
  16. Fly kites.  If you really want a project, make your own.
  17. Pick fruit.  Visit your local orchard and pick some fruit.  Not only is it good for you, but they usually have short, educational tours.
  18. Visit someone.   It doesn't have to be grandma, but it will get you out of the house and moving. Go to your local library, fire department, candy factory or bakery.   You may want to call ahead to verify the tour times and see if there is any cost involved. 
  19. Volunteer.  Call your local food pantry or soup kitchen and see if there is an age limit.  You can also talk to your Home Owner's Association.  Our HOA will assist elderly with yard work, cleaning, etc.  The children can help plant flowers or stain mailboxes.
  20. Make a fort.  Gather all those winter blankets and put them to use.  Throw a sheet down and let the kiddos eat lunch in their "secret club house".  Let them create a password or handshake.
  21. Go bowling. 
  22. Eureka Tetragon 5 Adventure 7-Foot by 5-Foot Two-Person TentCamp out.  Or in, depending on the weather.  Who says tents are only for outside use.  We camp out regularly right in our living room - pop tent and all!!  Make s'mores in your oven, tell scary stories, talk about what animals might be lurking outside the tent, and sing campfire songs. 
  23. Take a hike.  Pack a lunch, your magnifying glass, and a bug catcher and go for an adventure.
  24. Go to the movies.
  25. Create a journal.   Place some white paper between two sheets of construction paper.  Let the child decorate it.  Have the child make journal entries about their Summer fun.  They can use a combination of words or pictures to capture their memories.  You could take some old magazines and let them cut out pictures and create a collage for one of the pages.  This works great for little kids who can't write, but love to draw and color.
  26. Do a science experiment.  You can find limitless experiments at http://www.kids-science-experiments.com/.  Most (if not all) of the items needed you will already have around your home.  Be sure to engage your children by asking questions like: What happened first, second, last, and why?
  27. Go to the Olympics. Have a water balloon toss, egg toss, sack race, obstacle course, jump rope, hula hoop, etc.  You can make medals from construction paper and yarn. 
  28. How Do Dinosaurs Say I Love You?Visit another country. This trip doesn't require a passport.  Log onto the computer or visit your local library and discover another country.   Learn about it's language, food, traditions, and clothing.  Gear all of your meals and snacks around native dishes.
  29. Have Theme Week.  Create a theme using animals, colors, shapes, etc.  Learn about it, create a meal and do projects centered around it.  For example: Dinosaurs.  Learn about a different dinosaur each day (where it lived, what it ate, etc.), read books about dinosaurs (one of my favorites: How Do Dinosaurs Say I Love You?), eat dinosaur eggs for snack.  There are a lot of fun dinosaur recipes.
  30. Have a dance party.  Turn the music up and dance around!
Don't forget to check the zoo, aquarium, COSI, and amusement parks.  They typically put memberships on sale half-way through the summer and they normally last 12 months.  Also, don't forget about "old faithfuls": bubbles, chalk, board games, UNO, and hide and seek.  It's also fun to brain-storm with your child and come up with fun activities.  This comes in handy when you feel like you've exhausted all options and aren't quite sure if going to the park for the 10th time is going to excite your little one.  You never know, the 10th time to the park might ROCK just as much as the first.

I will certainly be sharing photos and stories of our Summer with you.  Please feel free to do the same or provide feedback on some of the suggestions. 

ROCK ON!

Saturday, June 5, 2010

Kermit has it wrong...it IS easy being green.

I will admit, I haven't always thought about protecting the Earth.  I will say that I have never intentionally littered.  However, a lot of things change after you have kids (at least it did for me.)  For example, I am now very fearful of flying, riding rollacoasters, and being abducted.  Seriously.  I never really gave a second thought to flipping upside down in the air 3 times followed by two cork screws.  And, I never thought about composting or recycling. 

It's IS easy being green and I love the fact that I am making a lasting impression on my children.  Along with making sure that lights (and TVs) are turned off, we do a  number of other things to make our "footprint" a little smaller.  For example we:
  1. Recycle all paper and plastics, including grocery bags and boxes. If you don't want to pay for your regular trash provider to take your recycling, there are usually recycling centers throughout your county.  For information on recycling centers near you, visit your county web-site.
  2. Use cloth napkins.   I found generic, white ones at Old Time Pottery.  They were very inexpensive and some are sewed crooked, but they sure are softer then paper towels or napkins, and the girls feel fancy when we eat. 
  3. Use rags to clean bathrooms, floors, mirrors, etc.  My grandmother gave this advice to my mother years ago when my mom was cleaning windows using paper towels.  Insightful, huh?  Think about what you use paper towels or napkins for.  Now, think about other things to use instead: a plate upside down over that spaghetti in the microwave.
  4. Turn OFF the water when we are brushing our teeth.  It's a no-brainer.
  5. I bathe both girls at the same time, in my large soaking tub....it not only saves water, but also time scouring two bath tubs!  Eventually, they will grow out of this, but then I'll just have to start timing their showers.
  6. Open the windows.   We have yet to turn our AC on and it's June.  There was a day when I dragged our kitchen table into the living room, under the ceiling fan (no joke); but other than that, it's been just fine.  Now, if you have a health condition, allergies, or a new baby in the house, this is probably not going to work for you; but, please consider it.   If you can't open the windows, try bumping the thermostat up a few degrees.  (It's also going to save you some green!!)
  7. Colgate Palmolive #47805 45OZ Eco Lem PalmoliveUse rechargeable batteries.  Most of our electronics have rechargeable lithium batteries.  For others, we have purchased the Energizer Rechargeables.  (Energizer NH15BP-4 Rechargeable Nickel Metal Hydride AA Battery 4 Pack)  Just make sure you have some extras, so your child can continue to play with the toy-of-the-hour while the old ones are charging.
  8. I buy eco-friendly cleaners when it's cost effective. Did I meantion I quit my job to be a SAHM? I have found some products that are LESS expensive.  For instance, Palmolive Eco+ diswasher detergent. My dishes (which are plain white) are just as clean and are NOT spotted.

These are all small changes that make a huge impact.  We used to fill (and sometimes over-fill) our "herbie kerbie" each week.  Now, we are down to 2...yep, 2, bags of garbage.  And, I am looking into composters, which should reduce our garbage even further.

The disaster in the Gulf brings a much needed awareness to our impact on the environment and it's never too early to make reduction, re-using, and recycling a way of life.  (Our 2 1/2 year old knows the difference between our paper/plastic/other bins.)  There are so many wonderful sites for kids.   A list of some great sites can be found at Eartheasy.  The site that I like is Eekoworld.  It's developed and maintained by PBS, so it is geared toward younger children.  There is a lot of animation and interaction, which I find keep my children engaged.  I would encourage you to first visit Eartheasy and find the site that best fits your family.

For more information about your local recycling programs and additional ways to help the Earth, go to Earth911.com.   

ROCK  RECYCLE ON!

Back to Basics

We all have basic needs: oxygen, water...food. It's a no brainer on the oxygen, water gets a bit more complicated with all the flavorings and sparklings available; but, deciding what food will satisfy is often troublesome.  Especially when you're responsible for feeding more than yourself. 

I don't know about your family, but mine likes to give input, are very independent and likes to "help" when I'm in the kitchen.  (I think it has something to do with licking the beaters...)  I imagine that's pretty typical of most families.  And, like most kids, my girls like to build things, make their own choices and have plenty of variety.  So, I have a ROCKSTAR trick that gets your family back to basics and satisfies everyone's hunger.

The Ploughman's Lunch 
(or dinner...or snack...)

According to Wikipedia, the Ploughman's Lunch can be dated back to World War II and typically consisted of bread, cheese and pickles.  Different variations include salad, some protein (like eggs) and fruit.  Although we would all love to eat bread and cheese for lunch, the addition of the other items really balance the meal out.  Now, add some dip and you are puttin' on a show! 

Irregardless of how many mouths you are feeding, the Ploughman's Lunch can help you feed everyone while keeping your sanity.  My suggestion is to load your platter with a combo of meat, cheese, fruit, veggies and a dip (or two).  My platter is a lazy susan we purchased at Sam's Club.  It spins around to minimize reaching AND it even spins on carpet (if you elect to eat your Ploughman's Lunch "picnic style" in the living room, like we often do).  I did find a similar one on-line at Brylane Home Lazy Susan Server Set (CRYSTAL,0).  It retails for $29.99. 

Little hands will enjoy building their own meal and you will enjoy seeing them get the nutrition they need to keep on ROCKIN'.  Even if their shows last a bit longer than your energy!   Everything you need to make a delicious Ploughman's Lunch is already in your fridge.   Cut up those cheese slices, use up that left over pepperoni, polish off those blueberries...the combinations are endless. It's also a great way to use up all those snacks...you know, when you don't quite have enough to give everyone an equal serving.  Or, fill it up with left overs and clean out your fridge.   

For dips, try:
peanut butter
ranch
cream cheese (add some food coloring for some real fun!)
fruit dip
hummus
salsa
queso
cheese dip
caramel
mustard
ketchup

For protein, try:
lunch meat  (dice the slices)
left over turkey, chicken, beef
pepperoni
hot dogs    (slice them width-wise)
hard boiled eggs

For carbs, try:
pretzels
crackers
tortilla chips  (try baking your own - it's fast, easy and cuts down on salt!)
chips
graham crackers
popcorn

And, of course, don't forget the FRUITS and VEGGIES!